If you’re looking to build real strength, improve performance, and avoid injury, mastering the fundamentals is non-negotiable. This article is designed to give you exactly that: clear, actionable guidance on proper lifting mechanics, smart programming, and practical strategies you can apply immediately. Whether you’re refining your form or rebuilding your foundation, you’ll find a focused deadlift technique breakdown along with key cues that translate directly to better results in the gym.
Too many lifters rely on scattered tips or social media shortcuts. Here, you’ll get evidence-informed principles rooted in exercise science, biomechanics, and real-world coaching experience. Every recommendation is built around improving efficiency, protecting your joints, and maximizing strength output.
By the end, you’ll understand not just what to do—but why it works—so you can train with confidence, precision, and long-term progress in mind.
Mastering the deadlift is mastering total-body strength. It recruits your posterior chain, challenges core stability, and tests grip like few other lifts. But high reward comes with high risk when form slips. That’s why this deadlift technique breakdown matters. From setup to lockout, every angle, breath, and bar path determines results. When you hinge correctly, brace intentionally, and drive through the floor, you build resilient strength that carries into sport and daily life. Precision protects progress. Commit to mechanics, and you’ll gain power, muscle, and confidence while minimizing setbacks (your lower back will thank you). For lifters, mastery is non-negotiable.
The Pre-Lift Ritual: A 5-Point Setup for a Perfect Pull
Before the bar ever leaves the floor, the lift is already won—or lost. A precise setup turns brute force into efficient force (and saves your lower back from writing checks it can’t cash).
1. Stance and Foot Placement
Start hip-width, toes slightly out. The bar should sit over your mid-foot—the balance point where force transfers cleanly through the floor. Some argue for a wider stance to “shorten the pull.” That can work for sumo, but in conventional, too wide often robs you of vertical drive and stability.
2. Bar Proximity
“Shins to the bar” exists for a reason. The bar should hover about one inch from your shins before you hinge down. If it drifts forward, you create a longer moment arm (physics for “harder than it needs to be”). A vertical bar path is the goal.
3. Grip Mechanics
Choose your weapon:
- Double overhand: best for warm-ups and grip strength.
- Mixed grip: stronger hold, slight imbalance risk.
- Hook grip: secure and symmetrical (yes, your thumbs will complain at first).
Keep knuckles down and squeeze hard. A lazy grip equals a loose upper back.
4. The Hip Hinge
Hinge back, not down. Maintain a neutral spine, hips above knees, below shoulders. Some lifters swear by ultra-low hips—but that turns your deadlift into a squat.
5. Creating Tension
Pull the slack out of the bar. Engage your lats by drawing shoulder blades down and back. You should feel the bar “click” into tension before it moves.
This deadlift technique breakdown isn’t flashy. It’s foundational. Master it, and every heavy pull feels intentional—not accidental.
Analyzing the Lift: A Two-Phase Guide to Execution
Let’s be honest—few things are more frustrating than grinding through a heavy pull only to feel it all in your lower back. You filmed it. You rewatched it. And somehow the bar still drifted forward like it had a mind of its own. Sound familiar? That’s why understanding this deadlift technique breakdown matters.
Phase 1: The Drive from the Floor to the Knee
This phase is dominated by leg power. The primary cue is to “push the floor away” with your feet, not to pull with your back. The back angle should remain constant during this initial push. If your hips shoot up first (a common pet peeve among coaches), you’ve turned it into a stiff-legged grind instead of a coordinated drive.
Maintaining Bar Path
The barbell must travel in a straight vertical line. Keeping the bar close to the shins is critical to prevent the load from shifting forward. When the bar drifts, leverage worsens instantly—like trying to carry groceries with straight arms instead of hugging them close (it gets heavy fast). Pro tip: think “drag the bar up your legs” to keep it tight.
Phase 2: The Lockout from the Knee to Standing
As the bar passes the knees, the movement transitions to a powerful hip thrust. The cue is to “drive the hips forward” to meet the bar.
Finishing Strong
Squeezing the glutes at the top achieves full hip extension. The final position is standing tall with a neutral spine—avoiding hyperextension or leaning back. Overextending may look dramatic, but it’s inefficient and risky.
If you’re serious about cleaner mechanics, study what makes an effective agility drill a performance breakdown. Precision in one movement reinforces precision everywhere.
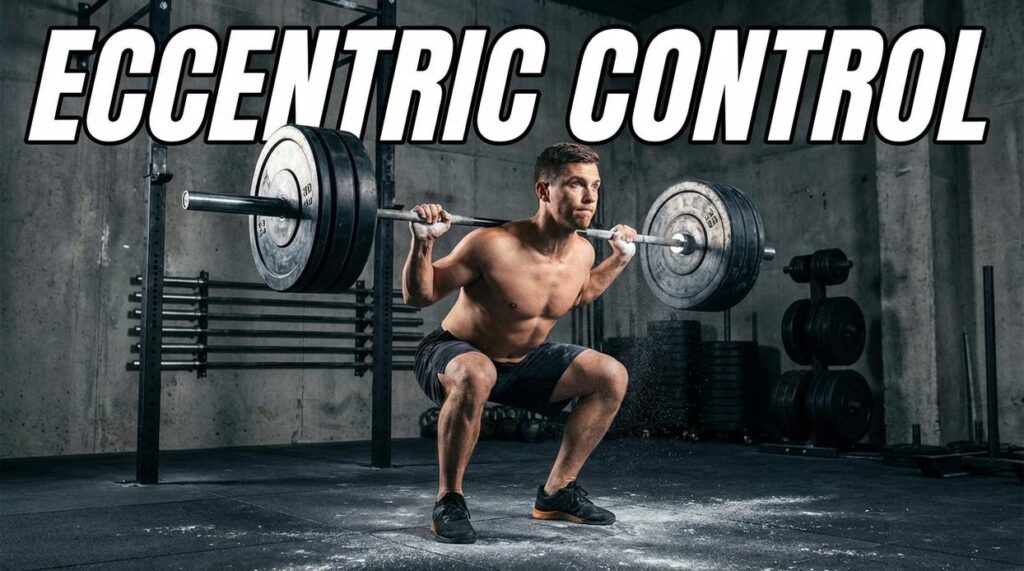
The Controlled Descent: Why the “Down” Is as Important as the “Up”

Most lifters obsess over the pull. But strength isn’t just built on the way up—it’s forged on the way down. Think of it as A vs. B: Option A drops the bar and hopes for the best; Option B controls the descent and builds resilient muscle. The difference shows up in performance—and injury rates (see Schoenfeld, 2010).
Reversing the Movement: The descent is not a drop; it’s a controlled reversal of the lift. Initiate the movement by pushing the hips back first.
Clearing the Knees: Once the bar passes the knees, you can then bend your knees to return the bar to the floor.
Here’s the payoff:
- Greater hamstring and glute activation
- Reinforced motor patterns
- Reduced injury risk between reps
That controlled eccentric (muscle lengthening under load) builds tissue tolerance and positional awareness. Pro tip: if your plates clang like cymbals, you’re rushing it. Treat every rep like a deadlift technique breakdown—because precision compounds.
Diagnosing and Correcting Common Form Faults
Even small technique errors can reduce force output and increase spinal load (a trade-off you never want). Below is a precise deadlift technique breakdown to spot issues early and fix them fast:
Fault: Rounding the Lower Back. Cause: Lack of core brace or premature hip rise. Correction: Reduce the weight, focus on bracing the abdomen, and engage the lats.
Fault: Hips Shooting Up First. Cause: Weak quads or starting with hips too low. Correction: Focus on the ‘push the floor away’ cue and ensure chest and hips rise together.
Fault: Jerking the Bar Off the Floor. Cause: Lack of pre-lift tension. Correction: Practice ‘pulling the slack out’ until you hear the ‘click’ of the plates against the bar before initiating the drive.
Why these details matter:
- Proper bracing increases intra-abdominal pressure, enhancing spinal stability.
- Coordinated hip and chest rise improves power transfer.
- Pre-lift tension boosts bar speed consistency.
Fix the flaw, unlock stronger, safer pulls.
Building a Stronger, Safer Deadlift
The deadlift is a technical skill built on a precise setup and a disciplined, two-phase execution. When that foundation slips, progress stalls. Plateaus and injuries are almost always a result of form breakdown, not a lack of strength. The upside? Fix the form, and strength follows.
A proper deadlift technique breakdown reminds you that consistency beats intensity. Perfect reps build powerful results.
Benefits you’ll notice:
• More strength without nagging pain
• Faster progress with less recovery downtime
Deload your weight, film your lifts from the side, and compare them to this guide. Small adjustments now mean bigger, safer pulls later.
As we explore the intricacies of proper deadlift technique, it’s essential to remember that optimizing our performance on the lift can also be influenced by factors like nutrition and gut health, which we delve into further in our article on ‘The Gut-Health Connection to Energy and Recovery‘.
Build Strength That Actually Lasts
You came here to sharpen your understanding of smarter training, better recovery, and sustainable performance—and now you have the blueprint. From dialing in your movement quality to applying metabolic conditioning with intention, you’re no longer guessing. You’re training with purpose.
The real pain point isn’t effort. It’s wasted effort. Spinning your wheels with inconsistent programming, poor form, and no clear progression is what stalls results and drains motivation. When your foundation is solid, everything changes—strength increases, energy stabilizes, and your body starts working with you instead of against you.
Revisit your form, refine your programming, and apply what you’ve learned—especially when reviewing your deadlift technique breakdown to ensure every rep builds power safely and efficiently.
If you’re ready to stop plateauing and start progressing with proven, field-tested strategies trusted by thousands of driven lifters, take the next step now. Dive deeper into structured metabolic conditioning, optimize your daily recovery habits, and commit to training with precision.
Stronger, leaner, more resilient results start with what you do next. Don’t just train harder—train smarter today.
 Barbara Powellorins is the kind of writer who genuinely cannot publish something without checking it twice. Maybe three times. They came to daily health optimization tips through years of hands-on work rather than theory, which means the things they writes about — Daily Health Optimization Tips, Zydaisis Metabolic Conditioning Drills, Holistic Wellness Strategies, among other areas — are things they has actually tested, questioned, and revised opinions on more than once.
That shows in the work. Barbara's pieces tend to go a level deeper than most. Not in a way that becomes unreadable, but in a way that makes you realize you'd been missing something important. They has a habit of finding the detail that everybody else glosses over and making it the center of the story — which sounds simple, but takes a rare combination of curiosity and patience to pull off consistently. The writing never feels rushed. It feels like someone who sat with the subject long enough to actually understand it.
Outside of specific topics, what Barbara cares about most is whether the reader walks away with something useful. Not impressed. Not entertained. Useful. That's a harder bar to clear than it sounds, and they clears it more often than not — which is why readers tend to remember Barbara's articles long after they've forgotten the headline.
Barbara Powellorins is the kind of writer who genuinely cannot publish something without checking it twice. Maybe three times. They came to daily health optimization tips through years of hands-on work rather than theory, which means the things they writes about — Daily Health Optimization Tips, Zydaisis Metabolic Conditioning Drills, Holistic Wellness Strategies, among other areas — are things they has actually tested, questioned, and revised opinions on more than once.
That shows in the work. Barbara's pieces tend to go a level deeper than most. Not in a way that becomes unreadable, but in a way that makes you realize you'd been missing something important. They has a habit of finding the detail that everybody else glosses over and making it the center of the story — which sounds simple, but takes a rare combination of curiosity and patience to pull off consistently. The writing never feels rushed. It feels like someone who sat with the subject long enough to actually understand it.
Outside of specific topics, what Barbara cares about most is whether the reader walks away with something useful. Not impressed. Not entertained. Useful. That's a harder bar to clear than it sounds, and they clears it more often than not — which is why readers tend to remember Barbara's articles long after they've forgotten the headline.